Customer Portal
Customer Portal
How much time do you spend each week chasing customers by email, updating a shared Google Sheet, or re-explaining what was said in a meeting? The Customer Portal is built for exactly that.
It gives your customers a dedicated, secure space where they can see exactly what they need to do, when to do it, and move forward without waiting for you. On your side, you stay in control of what is visible or not, collaborate directly within tasks, and track progress in real time from Skalin. Conversations happen where they make sense, responsibilities are clear for everyone, and you get back the time you were spending on coordination.
Availability
The Customer Portal is available in the Lead plan or as an add-on for the Scale plan. Scale plan users can try it free for one month.
# Why use the Customer Portal?
The Customer Portal delivers three key benefits to your customer relationships:
Autonomy: customers see all the actions they need to take — for example during onboarding — and access detailed task descriptions without having to ask you. No more shared Google Sheets or endless email threads.
Accountability: customers see deadlines and can take ownership of how quickly their onboarding or action plan moves forward. Responsibilities, dates, and expected deliverables are known by everyone. Customers are notified of their deadlines and know exactly what they need to do and when.
Clearer communication: comments directly on tasks replace long email threads with a jumble of topics. You receive a notification as soon as a customer writes, and you can reply directly from the right-hand panel in Skalin, just like a chat.
# Use cases
# Semi-autonomous onboarding
Share the steps of your customer's platform setup as tasks. Customers move at their own pace, independently on the steps that concern them, guided by detailed descriptions. Some tasks can be created automatically once previous ones are completed, via a playbook, for a progressive and structured experience.
# Document collection at the start of a project
The portal replaces the shared Google Sheet checklist. Customers check items off as they go, upload documents directly to the relevant tasks, and you track progress in real time.
# Post-QBR action plan
Break down the main themes of an action plan into multiple projects, with tasks assigned to your team and others to your customer. This structure brings clarity, better organisation, and makes it easier to prioritise topics. Responsibilities are clearly defined and agreed upon as soon as the QBR ends.
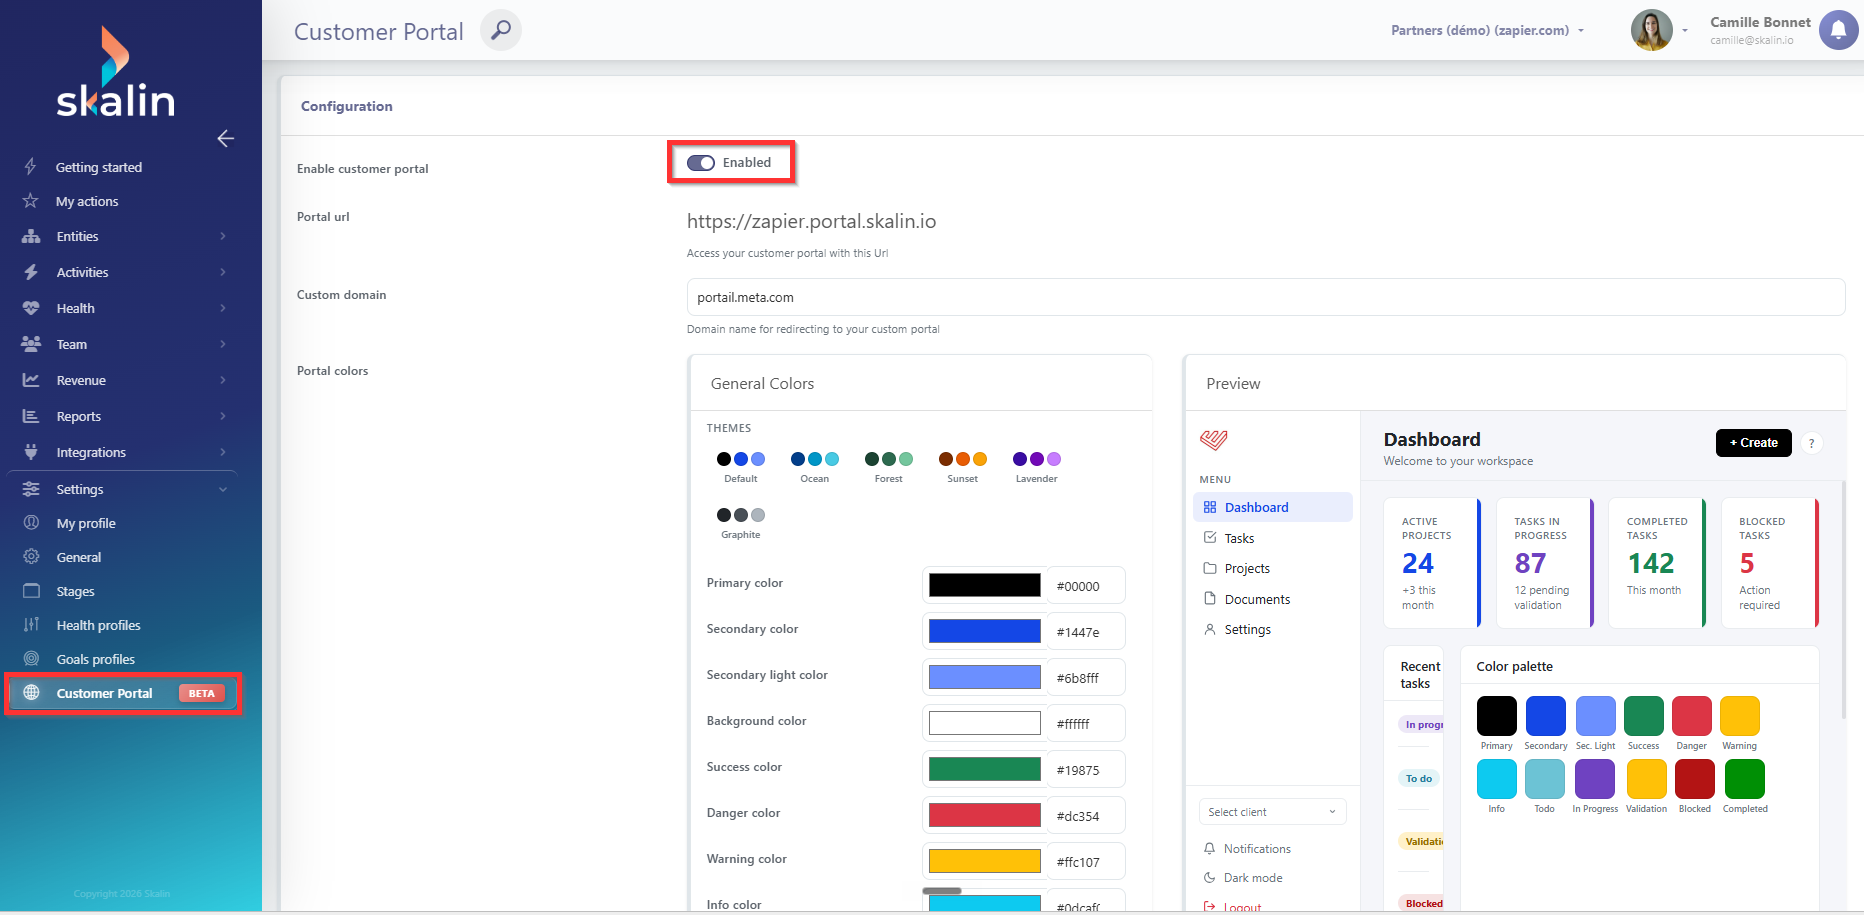
# Configuring the portal
Go to Settings > Customer Portal to activate the feature or start a free one-month trial if you have not yet subscribed.
# Portal URL
By default, each customer portal URL is structured as follows: customer_name.portal.skalin.io.
You can use your own domain, for example portal.yourcompany.com. See the subdomain configuration guide for detailed steps. In short:
- Your CTO, system administrator, or DevOps engineer creates a CNAME record on your domain pointing to the Skalin URL.
- You share the chosen URL with your Skalin CSM so that the domain and SSL certificate can be added to Skalin's infrastructure.
# Visual customisation
From the same settings page, you can customise the portal's appearance:
- Colours: choose a pre-configured theme or adjust colours individually. A live preview is available on the right.
- Logo: add your logo, which will appear in the top-left corner of the portal and in the email notifications sent to your customers.
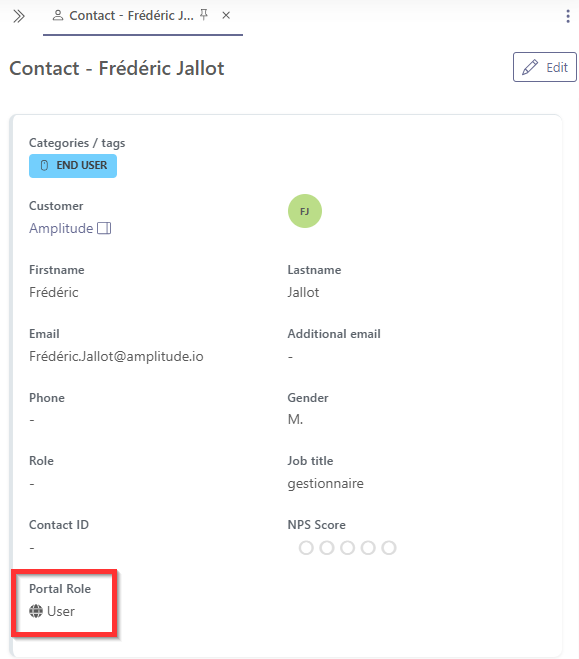
# Giving your contacts access to the portal
Before sharing the portal, you need to assign the portal role: "user" to each contact who should have access. This can be done directly on the contact record, or automated via a playbook if you want to include it in your onboarding process.
This role does not automatically send the portal link: you are responsible for sharing it with your contacts, along with guidance on how to get started.
Good to know
Recommend that your contacts save the portal link in their browser bookmarks so they can find it again quickly.
# Configuring tasks for the portal
Once the portal is active, you need to specify, task by task, what is visible to the customer and what stays internal. You can do this in two ways:
- Directly on a customer record, via the Tasks tab, for a one-off project.
- Via a task template, so that all future instances of that template automatically inherit the correct settings. This is the recommended approach for recurring projects like onboarding. See the Task templates section.
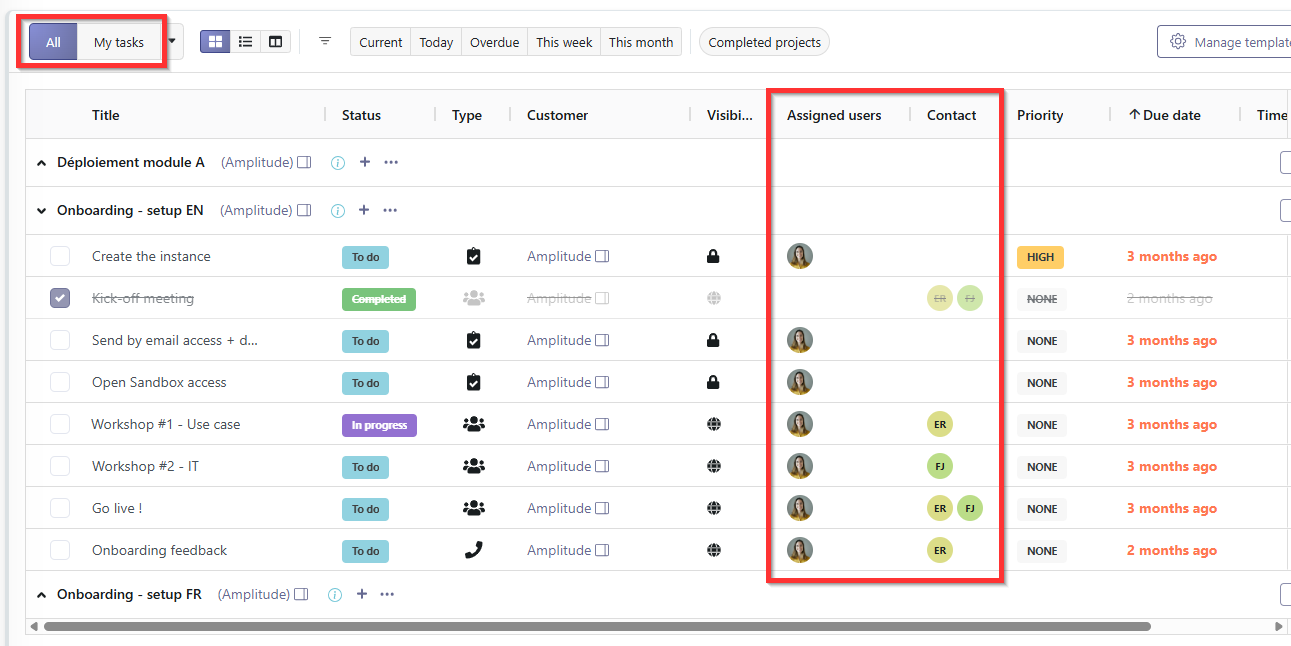
# Task visibility
For each task, set its visibility: portal (visible to the customer) or internal (visible to your team only).
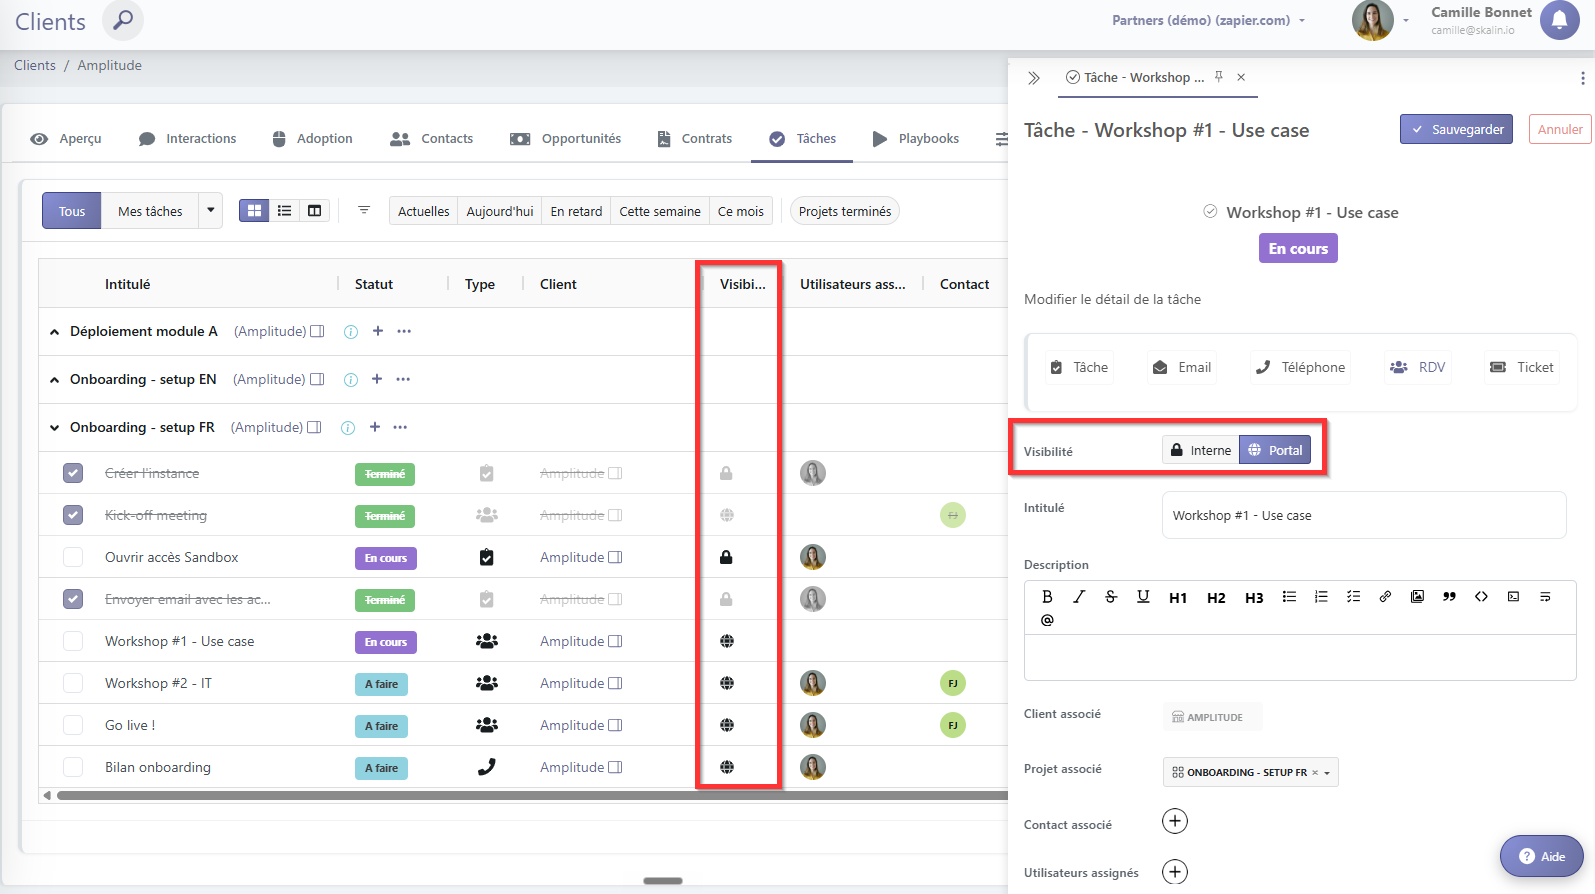
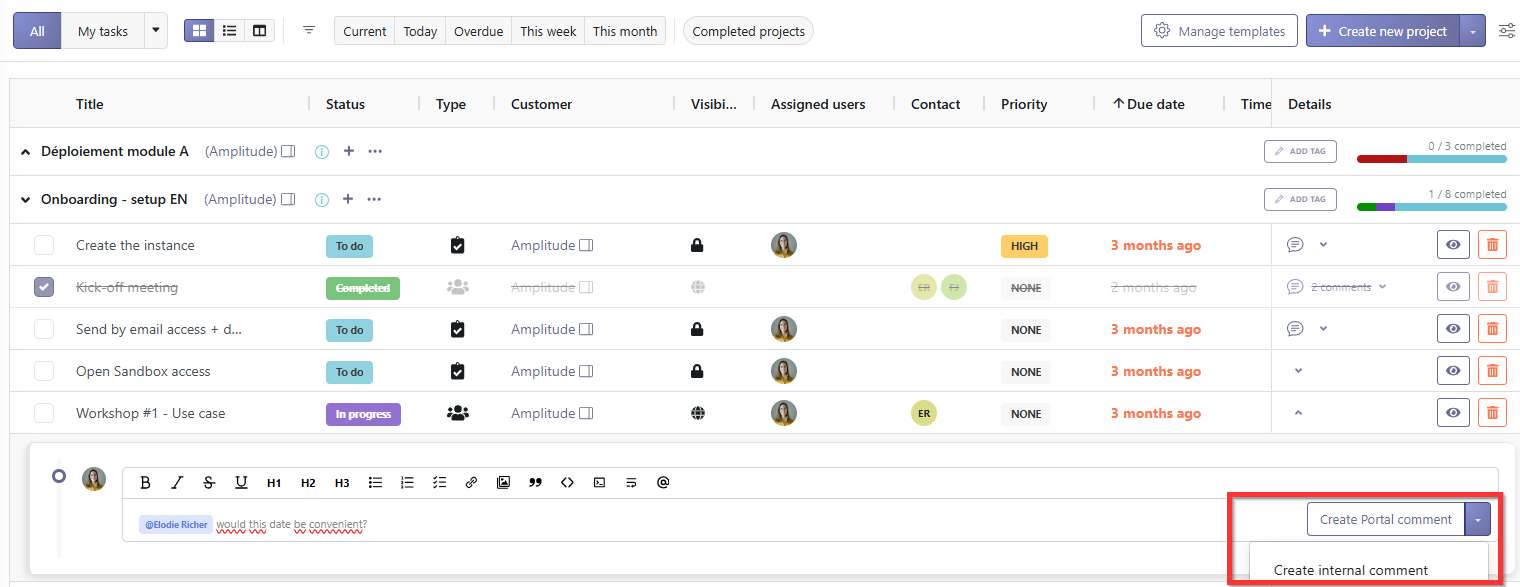
# Comment visibility
Similarly, each comment can be set as visible on the portal or internal. This lets you exchange privately with your team on a task while keeping the customer conversation thread in the same place.
Best practice
Write clear, self-explanatory titles and descriptions for tasks visible on the portal. Customers need to understand what is expected without any verbal explanation from you. Everything should speak for itself.
# Assigning tasks
You can assign a task to:
- One or more users from your team
- One or more contacts at your customer's organisation
Watch out
Avoid assigning a task to too many people: it dilutes accountability and no one feels truly responsible for moving it forward.
On the CSM side: if you assign a task to yourself, you will see it with the "My Tasks" filter active. Without that filter, it only appears under "All Tasks".
On the customer side: on the portal, each contact only sees in their dashboard the tasks they are assigned to. To see all tasks in a project, they need to go to the "Tasks" tab of the portal.
# Your customers' experience on the portal
# First login
On first login, each user enters their email address and receives a magic link to verify their access. This step only happens once.
An automatic guided tour then launches to walk them through the portal's main features.
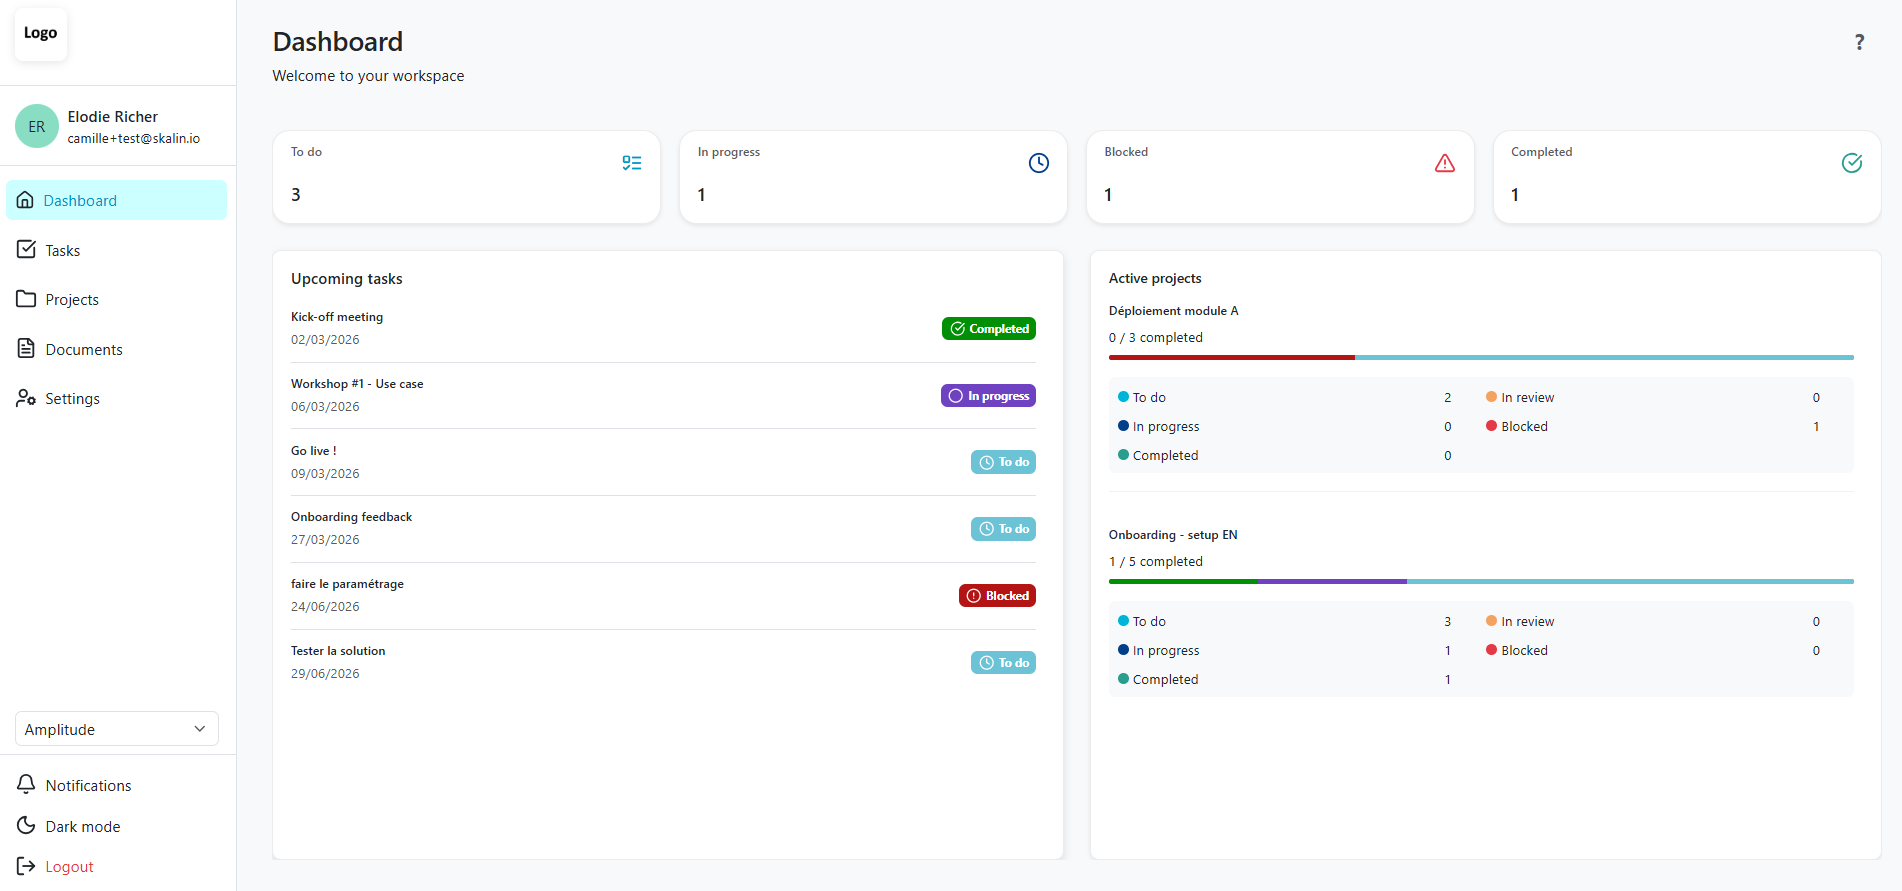
# Dashboard
After the guided tour, your contacts land on the dashboard, which displays:
- All tasks to do, in progress, blocked, or completed
- Upcoming tasks they are assigned to
- Active projects on which they have at least one task to complete
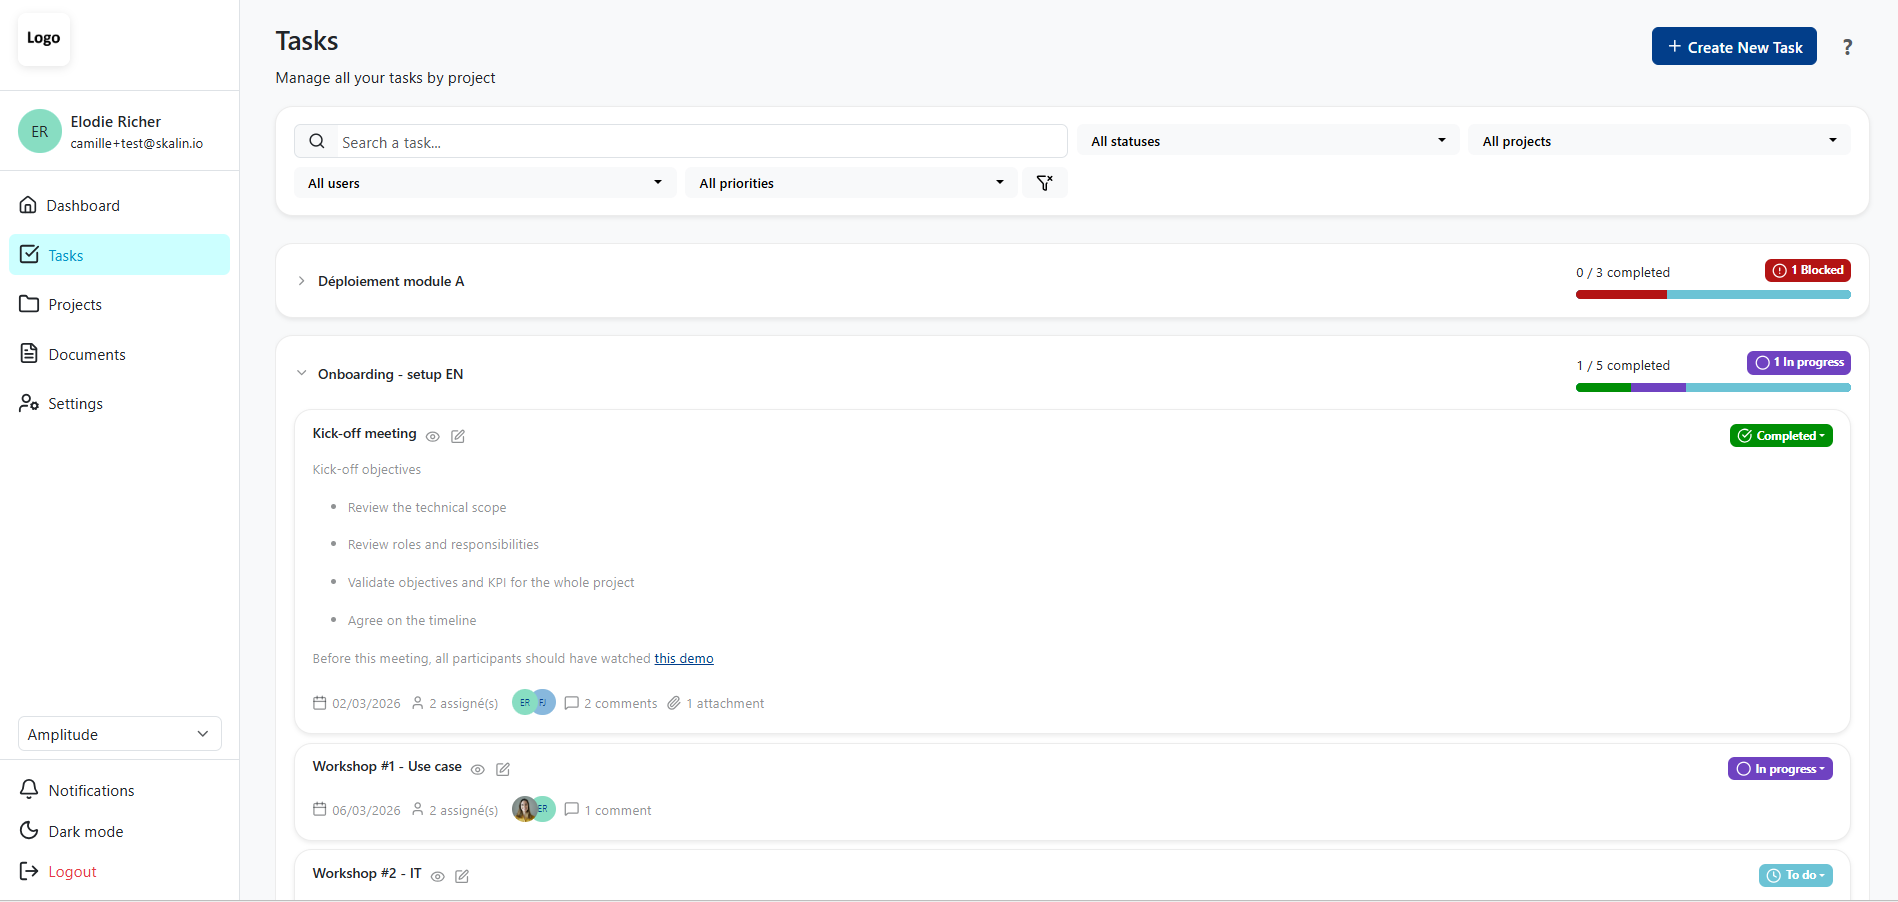
# Tasks menu
The Tasks menu shows all projects and tasks regardless of assignment. It is the full overview of everything visible on the portal.
Several filters are available at the top:
- Project status
- Task status
- Specific project
- Tasks assigned to a specific user
- Priority
- Keyword search
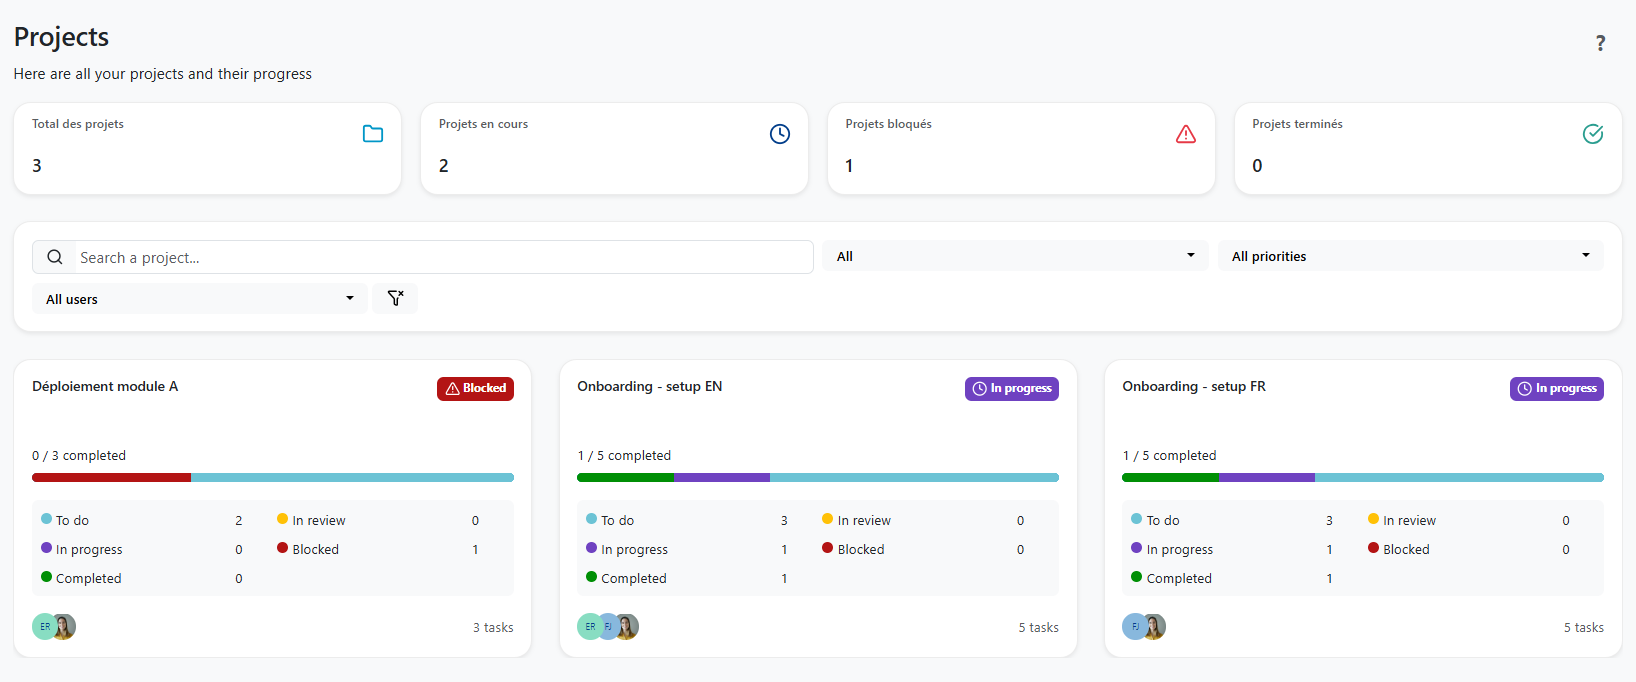
# Project view
The Project view gives an overview of the status of all active projects.
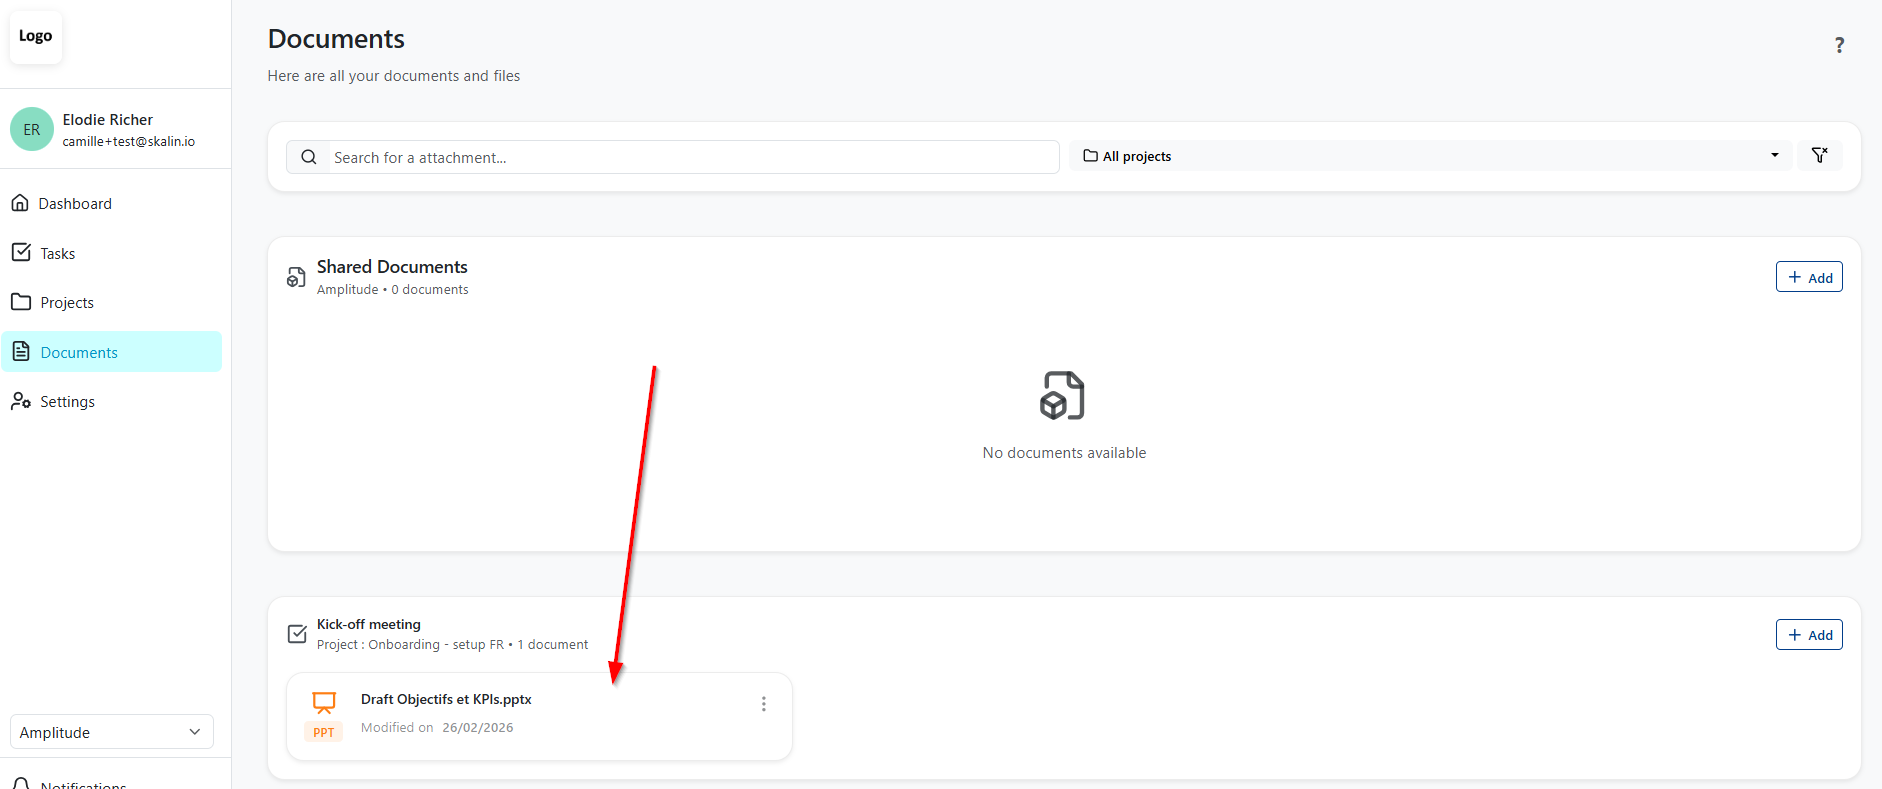
# Documents tab
The Documents tab centralises all documents shared via tasks or added directly from this tab. There is no need to remember which task a document was shared in.
# Portal settings
From the settings, your contacts can switch between light and dark mode, choose their language and date format, and manage their notifications.
# Notifications
To access notification settings, your contacts go to Settings via the left-hand menu of the portal.
By default, all notifications are active, both in-app (within the portal) and by email, for the following events:
- A new task is assigned to them
- A new comment is added on one of their tasks
- One of their tasks is approaching its due date
- They are mentioned via
@firstnamein a comment
Each contact can choose to receive only email notifications, only in-app notifications, or disable all notifications.
Best practice
Encourage your customers to always mention the relevant person in their comments using @firstname. This ensures the right person receives the notification, regardless of who is assigned to the task.
# Task detail view
By clicking on a task, your customers can access:
- The description (editable directly from this view)
- The due date and creation date
- Assigned people
- Attachments
- The full comment history
Portal users can create new tasks, change task statuses, add comments, upload documents, and edit existing tasks.
# On the CSM side: notifications and sync
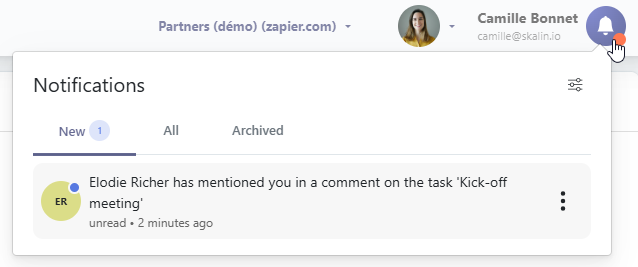
# In-app notifications
When a contact leaves a comment on the portal, a notification appears in the top-right corner of your Skalin interface via the bell icon with a red dot. Click on it to open the task in the right-hand panel and reply directly.
You can also receive email notifications for each new activity on a task.
# Two-way synchronisation
The portal is fully synchronised with Skalin:
- Comments are visible in the Tasks section in Skalin
- Task statuses are updated in both directions in real time
# Getting started checklist
Here are the steps to complete, in order, before you can share the portal link with your customer:
- Activate the portal in Settings > Customer Portal
- Customise the appearance: colours and logo
- Configure task visibility: set each task as portal-visible or internal (directly on the customer record or via a template)
- Assign tasks to the right users and contacts
- Assign the portal role: "user" to the contacts who need access (on the contact record, or via a playbook)
- Share the portal link with your contacts and walk them through the first steps
# Best practices summary
- Self-explanatory titles and descriptions: customers need to understand what is expected on their own, without any verbal explanation. Take care with every task description visible on the portal.
- One owner per task: avoid multiple assignments that dilute accountability. If several people are assigned, make sure each person knows what they are responsible for.
- Use templates to configure task visibility once and for all, rather than setting it manually on each project.
- Encourage @mentions in comments: this ensures the right person receives the notification, regardless of their task assignment.
- Ask contacts to bookmark the portal link so they can find it easily.
- Automate the portal role: "user" assignment via an onboarding playbook to avoid doing it manually for each customer.